New items with creation date in the past in Apple Notes
June 1, 2020
I never blogged during this pandemic, not even once, because it felt pointless with all that was (is) going on. I understand my reaction is the opposite of what many have done with the additional time at hand, being stuck at home, and I am in no way expressing a negative judgement; on the contrary, all those posts kept me sane and entertained, and I am very grateful for them! Of course the world had to continue spinning, and we were all looking for some normalcy, but still… I did not feel like writing here (additional proof that this refrain was not rational: I had no issues tweeting many unimportant things in the past weeks) and I don’t really feel like blogging even now. Most likely this will be a ramble more than a regular post, but I have the silliest thing to share and I’m going to pretend it’s just a day in January.
If I wasn’t against very long titles, you would be reading a post titled “No, you spent two hours figuring out how to create new notes with dates in the past in Apple Notes, in order to move your 80ish Day One entries there, only to learn after the fact that Notes.app cannot lock items that have PDF attachments”. Which is insane. As is it insane that you cannot password-protect an entire folder and have to go note by note instead. And don’t even let me start to comment about the fact that Notes.app does not allow to manually edit a date and avoid the whole point of this post…
But this is not (only) a rant about Apple Notes, which probably is still the best free note taking app with reliable sync and inline attachments, these limits notwithstanding. No, since I’ve done this not insignificant amount of research for nothing, because attachments & password-protection are both required for me, let me at least share the acquired knowledge and tell you, dear visitor from Google, how to create notes in the past in Apple Notes.
It’s a 4 steps process:
- You need a template Evernote XML file (.enex); here’s my basic one.
- In this file, with a text editor customise the title and body (both optionals, as you’ll be able to edit them later in Notes) and set the creation date (field ‘created’) in the YYYYMMDDTHHmmssZ format; don’t necessarily bother with the last edit date (field ‘updated’), because as soon as you’ll modify the note inside Notes.app, it will change to the current date.
- Add this “Evernote note” inside Notes via the Import in Notes in the File menu, which supports ENEX files.
- Check the new item in the newly created Imported Notes ƒ inside Notes.app; clicking on the date at the top toggles creation date and last edit.
TIL the Z at the end of a date stands for Zulu (see, a long journey but I learned something!), which is the same of UTC 🤯! Since we’re talking letters, and not only about the things I did not know, be careful to keep the T for separating the time and the Z at the end, or this time machine won’t work.
All this trouble because multi-platform journaling apps with inline images and sync are unicorns if you’re not willing to pay big money for subscriptions. Not that I’m against recurring food for developers, but I averaged 1 Day One entry per month in the years I’ve used the app, and 3 $ to save each one of my inner ramblings is a bit on the expensive side.
Finally, just to explain why it took me two hours for this project, be advised that you could theoretically add attachments to these new notes by embedding them, base64 encoded, inside the XML; you need to also store the MD5 hash for the file in the XML. I found this quite unreliable, but YMMV; if you decide to try creating a finished, rich note, from a XML, I suggest you download Evernote, create a free account, add and export a note with an attachment, so that you can experiment on a complete ENEX file, improving your chances of success.
Finally, if you managed to read this far, notes note note, notes! Notes? Just in case I didn’t write “note” enough time in this post.
Stay safe! I’ll try to return to a less infrequent posting schedule.
Printing HTML pages to PDF with wkhtmltopdf
September 11, 2019
Today I discovered a pretty neat command line tool, wkhtmltopdf, that allows to print a website (or a local HTML document) to PDF preserving the original page style (CSS, images, tables, etc.) in a way that is much truer to the original compared to what a regular browser does, at least in my experience; it also runs headless, if desired, so it can integrate nicely in other automation workflows.
It’s very easy to use:
-
Install wkhtmltopdf, either downloading a precompiled binary or compiling the source code yourself; I went with the ready-to-install package.
- Run the following command with just two parameters, the source URL / local file path and the destination file (or add additional parameters, if you need to tweak things a little):
wkhtmltopdf www.apple.com ~/Desktop/test.pdf - Enjoy your PDF document, possibly without printing it to paper because this tool by default preserves the original page background, which is likely not the most environmentally-friendly choice.
For comparison, here’s apple.com homepage saved with this tool versus the same page printed to PDF from Safari:
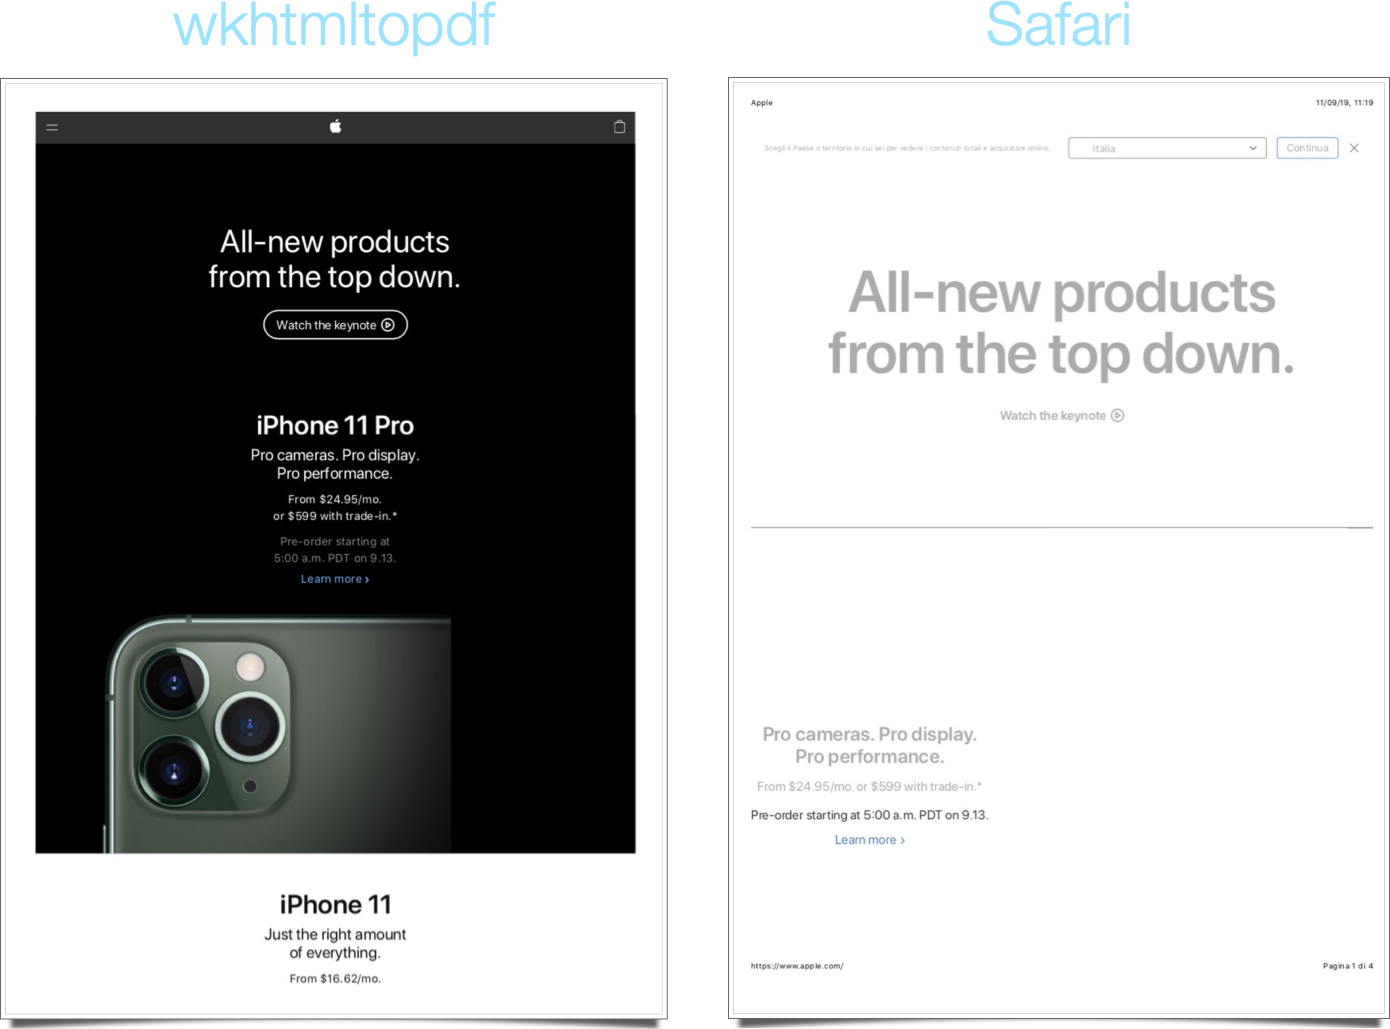
Pretty cool, uh?
Siri, tell Alexa to connect my phone
May 24, 2019
I usually fall asleep listening to podcasts, which means that every night I have to tell the Echo Dot to connect to my phone via Bluetooth and ask Siri to resume playing Overcast while setting a sleep timer.
For a while now I have had the second part automated in Shortcuts, inside a night-time routine that involves other steps too, but a bug with the Echo forced me to ask twice for my phone to connect to the Echo, combining a futuristic automation on the phone with the actual human (me) forced to the following dance 👏every👏single👏night👏:
Me: “Alexa, connect my phone”
Alexa: Your phone is already connected
(it is not)
Me: “Alexa, connect my 🤬 phone!”
(the phone finally connects)
Yesterday, a miraculous over-the-air update to the Echo fixed this annoyance, and the phone now connects at first try.
The resulting joy motivated me to walk the final line and automate the Bluetooth connection with Shortcuts too… #thefuture
It wouldn’t make much sense to share the actual shortcut, because it is personalized with my apps and needs, but here are the steps, in case you want to make your ladies in the tubes talk to each other:
- Record yourself saying “Alexa, connect my phone”;
- Save the audio file into the Shortcuts folder in iCloud Drive;
- Edit your “Going to bed” shortcut to play the audio file outloud and then proceed with the podcast playback with a preconfigured sleep timer.
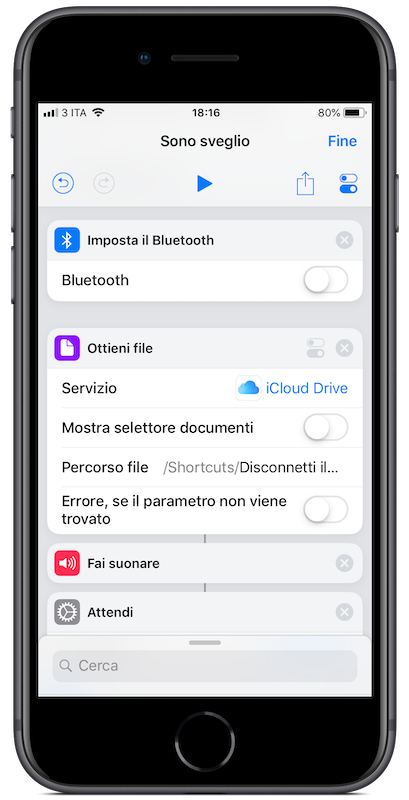
I also added the reverse “Alexa, disconnect my phone” recording to the morning routine shortcut for maximum laziness; about that, a warning: when the phone is actually connected, Alexa does not listen to herself speaking, so the shortcut includes a “disconnect Bluetooth -> wait 3 seconds -> reconnect Bluetooth” step before playing the disconnection audio file. Here’s a screenshot:
A couple of Keyboard Maestro macros
May 15, 2019
I’ve had a bit of fun with Keyboard Maestro today; I posted two new macros on the excellent KM forum, but seems only appropriate to link to them here on the blog too:
-
The first macro starts the local Jekyll server and open my localhost website in Safari and is great because my mind treats
bundle exec jekyll servelike a random sequence, inverting the order of the words every time I type them. -
The second one opens all the App Store Connect sections I visit every day in separate tabs, setting the date to the previous day as I used to do manually 👏 every 👏 single 👏 day 👏.
Hope these automation examples are useful / inspiring!
Post to Slack from Terminal using slack-cli
May 7, 2019
Since I haven’t posted in a while, I decided to share a nice utility I discovered today; as usual, this is not a tutorial, but you’ll be able to follow along and fill in the gaps.
At work, I wanted the ability to send documents to a specific Slack channel, so that multiple people can see them in an unobtrusive way (email would be too much for these low-priority docs). I was also looking to create a highly-automated process, ideally scanning each document from an office copier, sending it “somewhere” from there and having it magically appear in Slack; this would be possible for a paid Slack plan using this email Slack app, but we’re on the free tier and can’t use that.
The solution was slack-cli and I have to say it was both pretty convenient and fun to set up:
-
Create a custom bot for Slack and save its API key for later; no need to configure hooks or anything else, just type a name, pick an icon and add an optional description.
-
Add the new bot to the Slack channel where you want it to post.
-
Install slack-cli via brew as described in the instructions on GitHub; please consider that you’ll have to quit and re-enter Terminal after installation, before initializing it.
-
Execute the Terminal command ‘slack init’ and paste the bot API key.
-
Almost there! Try the bot, both sending a message and uploading a file:
slack chat send ‘Hello from Terminal’ –channel ‘#mychannel’
slack file upload /Users/myuser/Desktop/file.pdf ‘#mychannel’ –comment ‘File uploaded from Terminal’ –title ‘FYI, this is the file for today’
Finally, apply some magic with Apple Script or with your automation app of choice: retrieve each email sent from the office copier, temporarily save the attachment and post it to Slack using slack-cli; we’re doing this using our 4D database, so I can’t post the actual steps for that because they are very much custom-tailored to our environment.
Hope this helps someone else along the way!
Mojave Quick Actions
January 3, 2019
I must admit that, when macOS 10.14 Mojave was announced last June, I quickly dismissed the new Finder’s Quick Actions as a gimmick, and never looked back. Then this week a couple of things made me revisit my superficial dismissal of this new automation feature and proved me wrong.
I was looking for a way to quickly move files from the Downloads ƒ to other frequent destinations and I was almost ready to try Power Menu for Finder, but the lack of a trial was a bit of a bummer. Then I took advantage of the embedded “Rotate image” action a couple of times and immediately realized that I could try that route to automate some files operations, and I’m here to testify that it is both very effective and incredibly easy to implement.
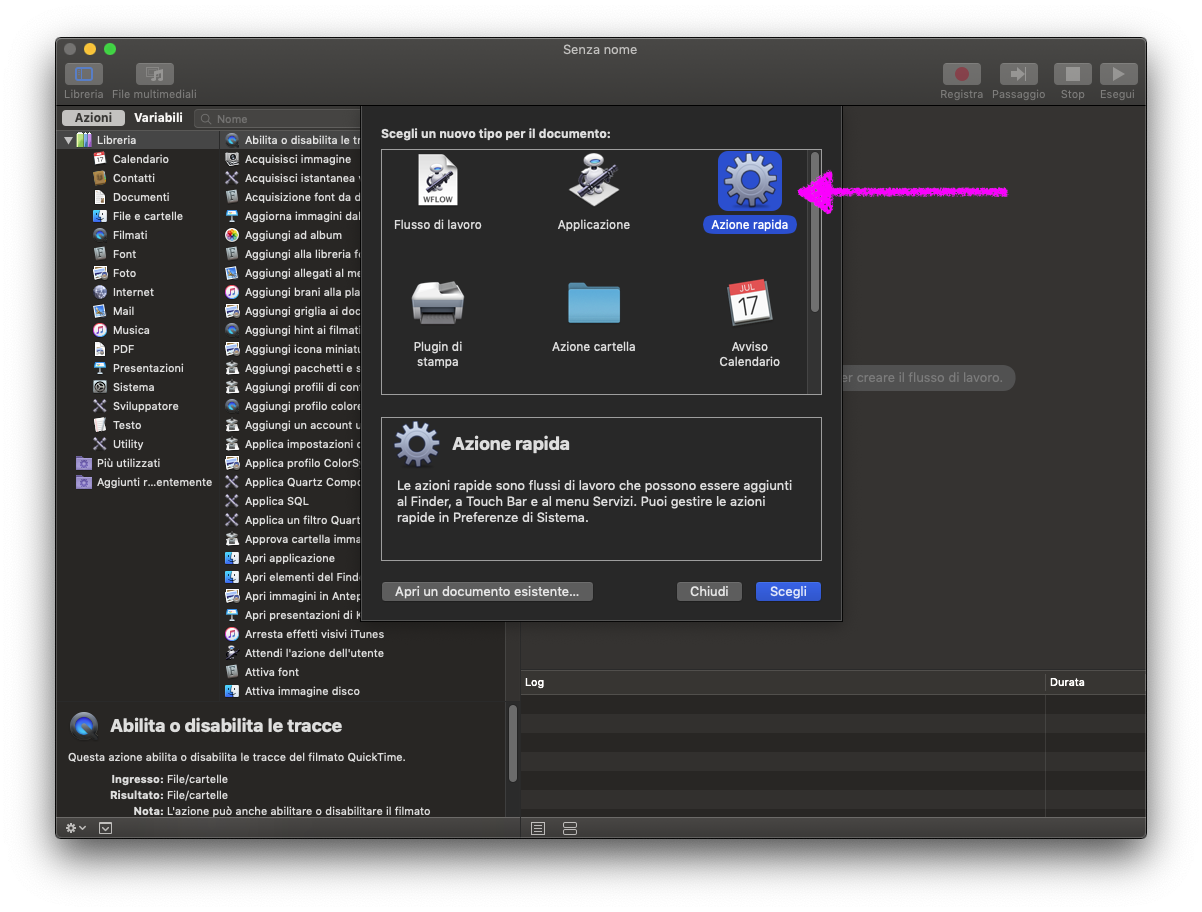
These “shortcuts” are made in Automator, simply by opening it and selecting to create a new Quick Action:
 (Sorry for the screenshots in Italian instead of English, but I thought the arrows would be enough to point you in the right direction without having to reboot my Mac to change language…)
Then you select some conditions for when the action should appear in Finder and build the workflow according to your needs.
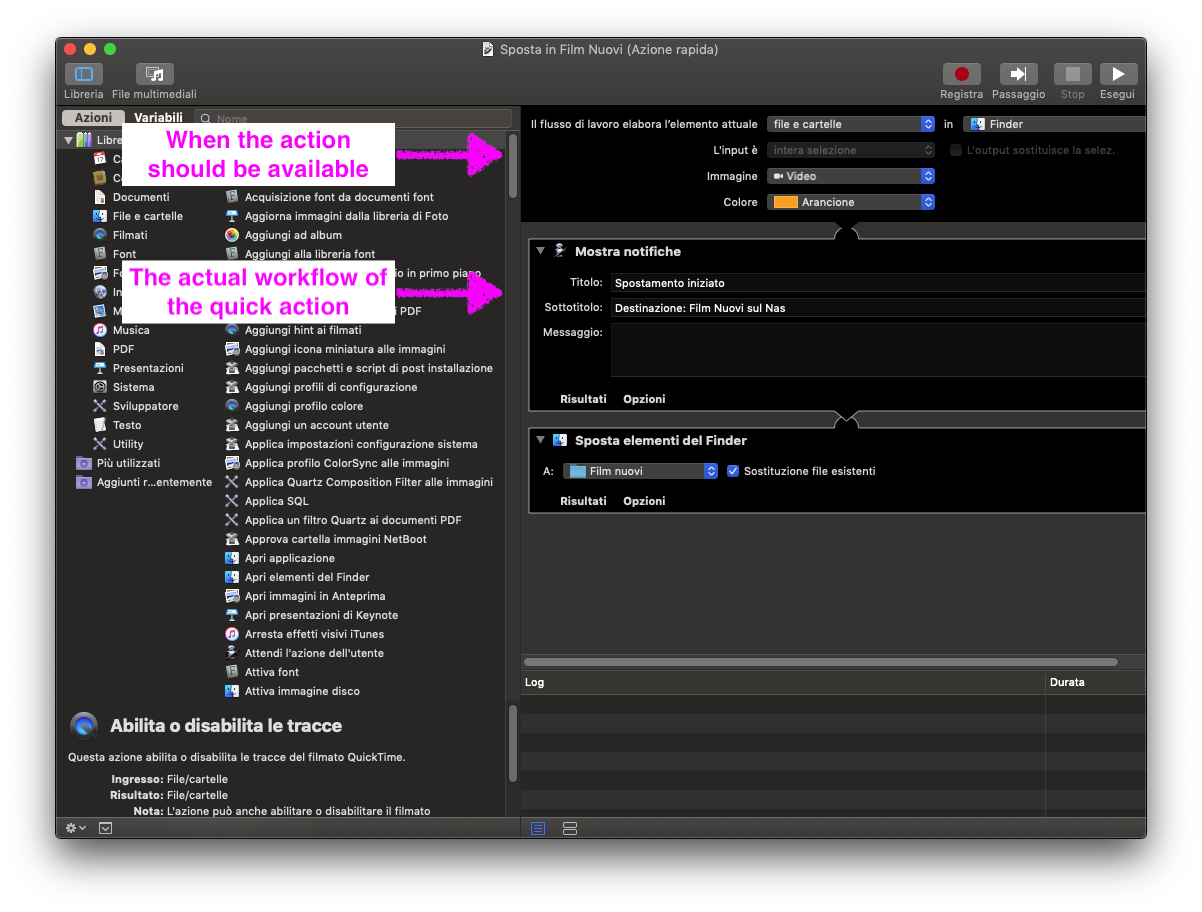
Here’s one I made for moving video files to my NAS; the notification is there because the copy operation happens without triggering the usual copy/move window and I wanted some kind of feedback:
After saving the action in Automator, it appears in Finder; the cool thing is that the action is only shown when appropriate (meaning, when the file type matches what you did set in Automator), so you can have specific Quick Actions for different kind of files:
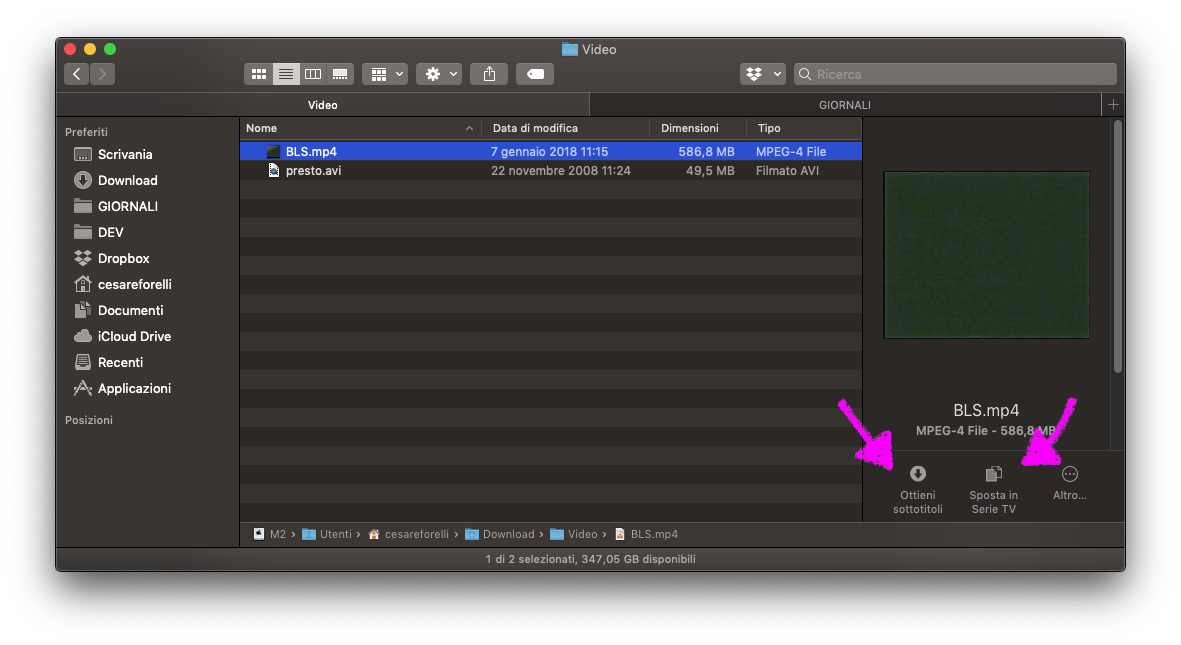
I already made multiple actions for other operations, like retrieving subtitles for video files, and I’m very happy with this addition to Finder, so if you also didn’t look at it twice in September, maybe take another look at it.
The only thing I hope Apple will improve in future releases is the number of concurrent actions shown in Finder, currently two plus a more button that groups the others. I’d love to be able to see more actions when I enlarge the pane.
AppleScript for DarkSky weather forecast
December 12, 2018
For a while now, me and my sister wanted to make an habit of a Thursday walk with my 🐺. Trying to actually remember it with our brains would have been enough, or we could have made an appointment in a shared calendar. Instead, I had fun assembling the following AppleScript, a.k.a. the nerdiest solution to a non-existing problem ever; I awarded myself bonus points for scheduling a cron job to run it every Thursday morning.
I’ll let the actual script, with a few comments, explain itself. Please be advised that I’m no AppleScript expert and I recognize that this script could be written better (the variable names are unusually bad for my standards), but it works and it’s enough for such a toy.
# Get local weather forecast from DarkSky for Thursday, send a local notification and an iMessage.

# This script requires JSON Helper, the most amazing app ever, that let you access JSON directly from AppleScript; it's free,  more details and download link here: http://www.mousedown.net/mouseware/JSONHelper.html
# The weather-fetching portion of this script is heavily based (read copied) on this gist: https://gist.github.com/Pe8er/a37729b8fd55a7fd5f9674103659827a
# The DarkSky API, also required for this to work, is pretty straightforward, but here's a link to the documentation: https://darksky.net/dev/docs; you can access this API for free with a limit of 1.000 calls per day, more than enough for this kind of use.


set APIKey to "YOUR_API" # Replace with your DarkSky API key


# 1. I want to know if today is Thursday, and if it's not, I want the date for the next Thursday.

set nextThursday to current date

if nextThursday's weekday is Thursday then set nextThursday to nextThursday

repeat until nextThursday's weekday is Thursday
	set nextThursday to nextThursday + days
end repeat

set {year:nextThursdaysYear, month:nextThursdaysMonth, day:nextThursdaysDay} to nextThursday

set forecastDate to (nextThursdaysYear as string) & "-" & nextThursdaysMonth * 1 & "-" & nextThursdaysDay & "-13-30-00" # I'm fine hardcoding the time, YMMV

set dateString to ((nextThursdaysDay as string) & "-" & nextThursdaysMonth * 1 & "-" & nextThursdaysYear & " 13:30:00")
set theDate to date (dateString)
set aDateObject to theDate

# 2. I prefer to feed the date to DarkSky API in Unix format (seconds since January 1st, 1970); for this to happen, a very odd thing is necessary: we need to convert it to another format and then to string to get rid of the exponential notation introduced by AppleScript. Trust me on this, it works.

set unixSecsExponential to aDateObject - (time to GMT) - (date "giovedì 1 gennaio 1970 00:00:00") # Adjust according to your locale.

set conversionString to unixSecsExponential as inches

set unixDate to conversionString as string

# 3. Now, let's fetch the forecast
tell application "JSON Helper"
	try
		set latLonDate to "YOUR_LATITUDE,YOUR_LONGITUDE," & unixDate # Replace with your location; you can fetch the latitude and longitude with https://www.latlong.net/; beware of the commas.
		set weather to fetch JSON from "https://api.darksky.net/forecast/" & APIKey & "/" & latLonDate & "?exclude=minutely,hourly,daily,alerts,flags&units=ca" # See documentations for the parameters.
	on error e
		return e
	end try

	try
		set temperature to temperature of currently of weather
		set weatherStatus to icon of currently of weather
		set summary to summary of currently of weather
	on error
		return "¯\\_(ツ)_/¯"
	end try
end tell

# 4. Emojis, just because

if weatherStatus is equal to "clear-day" then
	set myIcon to "☀️"
else if weatherStatus is equal to "clear-night" then
	set myIcon to "🌙"
else if weatherStatus is equal to "partly-cloudy-day" then
	set myIcon to "🌤"
else if weatherStatus is equal to "partly-cloudy-night" then
	set myIcon to "☁️🌙"
else if weatherStatus is equal to "cloudy" then
	set myIcon to "☁️"
else if weatherStatus is equal to "rain" then
	set myIcon to "🌧"
else if weatherStatus is equal to "sleet" then
	set myIcon to "⛈"
else if weatherStatus is equal to "fog" then
	set myIcon to "🌫️"
else if weatherStatus is equal to "wind" then
	set myIcon to "🌀"
else if weatherStatus is equal to "snow" then
	set myIcon to "❄️"
else
	set myIcon to weatherStatus
end if

# 5. Prepare a string with the received forecast

set weatherMessage to "Forecast for " & theDate & ": " & myIcon & ", " & (round (temperature)) & "° C"

# 6. If the weather is bad, nothing happens; if it's good enough, a local notification is triggered and an iMessage is sent to the specified contact.

if weatherStatus is equal to "rain" or weatherStatus is equal to "snow" then
	return "Sad wolf today... " & weatherMessage
else
	set messageForFriend to weatherMessage & ". Let's walk the 🐺?"
	display notification messageForFriend sound name "Purr"
	tell application "Messages" to send messageForFriend to buddy "YOUR_BUDDY@icloud.com" of (service 1 whose service type is iMessage) # Replace with the iMessage account for the recipient.
end if
Getting started with PHP and TCPDF
November 29, 2018
For years I wondered how PHP scripts actually worked and yesterday I found out that it’s not too hard to start playing with them, as often is the case in this lucky age we live in… most answers are just a Google search away and things are only hard until we actually look at them with purpose.
First, my use case: generate PDF files in code with TCPDF. TCPDF is a well established library, with no dependencies, but it’s actually been discontinued in favor of a new version; for my needs, this mature product is fine and it’s with it that I made the experiments I describe here.
A quick way to get something running in just a few minutes is to download TCPDF from Github, extract it to a folder and open Terminal in that location; then we launch the local PHP server with just a command:
php -S localhost:8000
Now, before we can actually generate a PDF, we need to pick one of the samples from the library ‘examples’ sub folder, open it with a text editor and change the import statement to:
require_once(‘../tcpdf.php’);
Last, we load that script in Safari, pointing at a URL structured like the following:
http://localhost:8000/examples/the_example_you_chose_and_edited.php
Boom, if everything went smoothly (this post is not a real tutorial, so you might need to figure out some things yourself), that local server running in Terminal is serving you a PDF document generated from the script.
From this starting point, a lot of experimenting can follow; for instance, changing the output statement in the script to the following will save the PDF file directly to disk (you probably need to change the permissions of the folder to r/w for everyone in order to make this test work):
$pdf->Output(“test.pdf”, “F”);
If you’re interested and got this far, both the documentation and StackOverflow will help you achieve anything you desire with this library; myself, I’m happy to finally be able to look at a PHP script with at least an idea about how to run it.
One last note: obviously, you won’t usually run something like this from the php local server in Terminal… I instead use the Apache webserver that ships with macOS, also a pretty easy thing to start to play with, provided that you need to manually launch it after enabling PHP in its httpd configuration file, but that’s a post for another day.
Another tool in my belt

November 19, 2018
Today I was asked for a way, maybe a small custom iOS app with bonus points if it had a CarPlay extension, to occasionally retrieve an audio file via HTTP and play it in the car. The path for the file is known and remains the same, but the file name changes every day and it corresponds to the date in yyyyMMdd format. No need to archive the file for posterity or retrieve previous days, the goal was just a quick way to fetch this MP3 and treat it like a podcast while being on the move.
Since I remembered CarPlay apps being limited by Apple to specific use cases, I immediately gave up the bonus points and focused on the quickest way to achieve the goal. I should also confess I’m trying to reduce the number of new apps I work on concurrently, so I wasn’t excited by the prospect of opening Xcode for this…
The next idea involved a cron job, Apple Script and iTunes, plus the existing Apple Music subscription of the person requesting my suggestion: I began imagining to write a script, schedule it for running every day and either add the file as a song to iTunes and have it uploaded to the Music library in the cloud or copy the file to iCloud to play it directly from the Files app when needed. Maybe Overcast Premium could have been a part for this and resurrect the CarPlay part, but it seemed overly complicated: I was thinking of repeating an operation every day on a different device for just an occasional need.
Then I thought of Shortcuts, and boy it was easy, effective and elegant to achieve a functional solution with it!
I actually made two alternatives, spending less than 10 minutes total: one saves the file to iCloud and the other opens it directly in VLC, where playback starts automatically. Both have 3 steps and a variable to format the date, and couldn’t be simpler.
Every time I have the chance to use it, Siri Shortcuts stands out as an amazing tool for automation, with great flexibility and an outstanding approachability. It truly deserves a spot in my tool belt, and you should think of it more often too!
P.S. In the ongoing effort to add tools to my belt, I should point out that this post has been written, committed and published using only an iPad and an iPhone. This includes the screenshots placed in the device frames, made using this Shortcut made by Viticci that is pure witchcraft.
P.P.S. The more I work on an iPad, the more I believe the worst limit to productivity here is not iOS, it is the Smart Keyboard not having backlighting and switching between locales by accidentally pressing the dedicated button… but this is a post for another day.